Keto
Gluten-Free
30 Minutes
Weeknight
Bone-in, skin-on chicken thighs with shatteringly crisp skin and genuinely tender dark meat—under 30 minutes, no marinade, no flour. A dry brine draws out and reabsorbs moisture while raising skin pH, then baking powder accelerates Maillard browning and dries the surface further; together they produce a texture impossible to achieve with wet seasoning alone. Below: the exact mechanics of dry brining, the timing table by weight, and the technique checklist that separates shatter-crisp skin from yielding results.
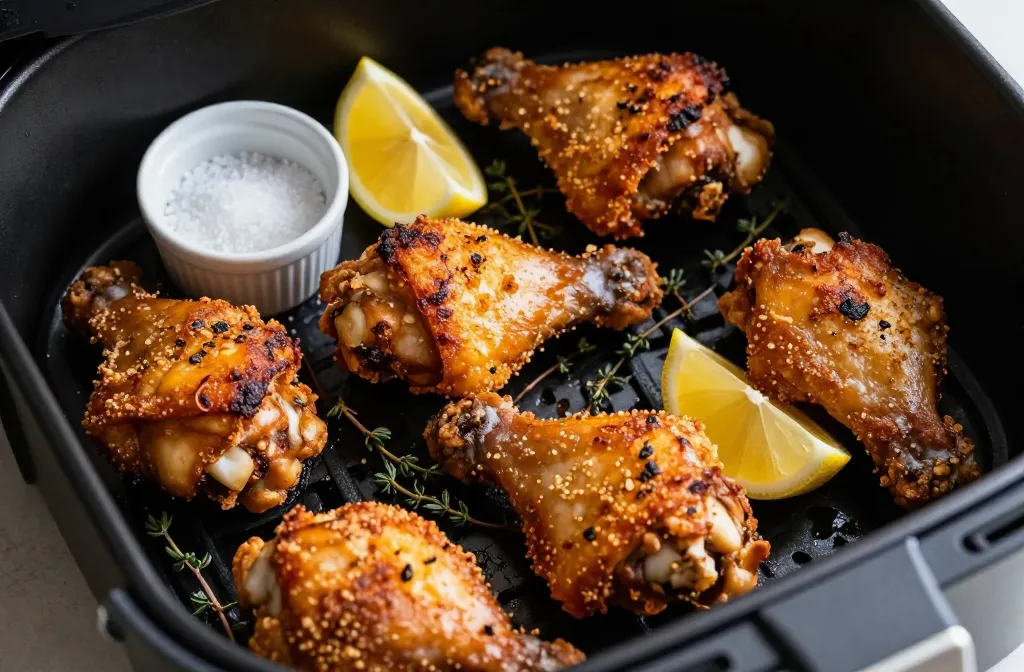
Extra Crispy Skin-On Air Fryer Chicken Thighs
Ingredients
Method
- Dry brine up to 24 hours ahead Mix kosher salt evenly over the thighs and refrigerate uncovered for at least 1 hour, or overnight. Pat dry thoroughly with paper towels before seasoning.
- Combine garlic powder, black pepper, smoked paprika, onion powder, dried thyme, and baking powder in a small bowl. Taste the blend to ensure salt is balanced.
- Rub the seasoning blend evenly over all surfaces of the thighs. Tuck any loose skin underneath so it doesn't shrivel during cooking.
- Toss the seasoned thighs with 1 to 2 teaspoons of neutral oil total—you want a light coat, not a slick.
- Preheat the air fryer to 400–425°F (200–220°C) for 3–5 minutes until the basket is screaming hot.
- Place thighs in the basket skin side down, leaving space between each one for airflow. Do not crowd or stack.
- Cook for 10–12 minutes skin side down, then flip skin side up.
- Cook another 8–12 minutes until the skin is deep golden and crispy, and the internal temperature reaches 175–190°F (79–88°C) measured in the thickest part of the meat.
- Rest for 5 minutes on a warm plate. The skin will crisp further as it cools slightly, and the juices will redistribute.
- Serve hot with your choice of sides and finish with flaky salt if desired.
Notes
Baking powder tip Use baking powder, not baking soda. Baking powder raises pH and encourages blistering and browning. If you skip it, ensure the skin is blotted completely dry and the seasoning includes enough salt for crunch.
Temperature guide Aim for 175–190°F internal temp. Thighs have more connective tissue than breasts and become juicy and tender above 175°F. At 165°F they are safe but less forgiving; above 175°F the collagen melts and the meat stays moist.
Crisp insurance If skin looks perfect but temp lags, lower heat to 360°F and continue. If temp hits target but skin needs more oomph, blast 2–3 minutes at 425°F and watch closely.
Boneless thighs Cook at 380–400°F for 6–8 minutes per side, aiming for 175°F internal. They cook faster and still crisp, but less dramatically than bone-in.
Serving Serve immediately with flaky salt, lemon, hot honey, chimichurri, tzatziki, or a quick lemon-garlic yogurt sauce. Pairs beautifully with slaw, salad, roasted vegetables, or rice.
Storage Refrigerate leftovers in an airtight container for up to 4 days. Re-crisp at 375–400°F in the air fryer for 4–6 minutes. Cold leftover thigh meat shreds beautifully for salads, wraps, and tacos.
Why This Recipe Works
Every step addresses a specific physiological or chemical mechanism.
A dry brine seasons the meat from the inside and improves skin crispness. Salt draws moisture from the muscle tissue osmotically during the first several hours. As the brine duration extends, that moisture reabsorbs into the meat along with the salt ions, seasoning deeply from the interior outward. The initial moisture loss also leaves the skin surface drier, removing a barrier to browning. This two-stage effect—deep internal seasoning plus a drier starting surface—is impossible to achieve with a liquid marinade, which adds surface moisture and cannot penetrate the subcutaneous fat layer that underlies the skin.
Baking powder raises the skin’s pH and accelerates Maillard browning. Maillard browning occurs when amino acids and reducing sugars react under heat, typically beginning above 150°C (300°F). Baking powder (sodium bicarbonate, which is alkaline) raises the pH of the skin surface, lowering the temperature threshold at which this reaction initiates. The result is browning that begins sooner and progresses more aggressively in a given cook time. Additionally, the alkaline environment slightly denatures the skin proteins, making them release moisture more readily during cooking. A tsp of aluminum-free baking powder across four thighs produces a noticeably crispier, more deeply browned exterior than the same thighs cooked without it.
A preheated basket initiates the crust immediately. Placing cold thighs into a cold basket means the surface temperature rises slowly over several minutes before browning can begin. During this period, residual surface moisture evaporates as steam, which prevents crust formation. A 3–5 minute preheat at 400–425°F ensures that the moment skin contacts the basket, the surface temperature crosses the Maillard threshold, beginning browning before moisture can escape as steam. This step is consistently skipped and accounts for more pale-skin results than any other variable.
Skin-side down first renders the subcutaneous fat. Thighs carry a layer of fat directly under the skin, above the muscle. During the first 10–12 minutes with skin-side down, this fat melts downward through the skin by conduction, thinning the fat barrier that sits between flesh and exterior. When the thigh flips, this now-thinned fat layer provides less insulation, allowing the surface to crisp more aggressively. Flipping earlier shortcuts fat rendering and produces skin that browns on the outer face but remains thick and yielding underneath.
The 175–190°F internal target is not a safety threshold—it is a texture target. Poultry is safely cooked at 165°F. Dark meat thighs, however, benefit from higher temperatures because of their high collagen content. Collagen is the primary structural protein in connective tissue. Below 175°F, it remains partially solid, producing meat that is texturally tighter and more fibrous. Above 175°F, collagen denatures fully, converting to gelatin, which distributes through the muscle fibers and produces the yielding, juicy bite associated with properly cooked thighs. Unlike lean white meat, dark meat does not dry out at 175–190°F because of its higher intramuscular fat content.
Which Option Is Right for You?
The dry brine and baking powder method works identically across all cuts. Cook time and final texture vary by bone and skin presence.
| Cut | Best For | Cook Time | Difficulty |
|---|---|---|---|
| Bone-in, skin-on thigh | Maximum crispness, most forgiving — the benchmark | 22–25 min | Beginner |
| Boneless, skin-on thigh | Fast cook, still crackly skin, weeknight speed | 16–18 min | Beginner |
| Boneless, skinless thigh | Lower fat macro, meal prep slicing, minimal crust | 12–14 min | Beginner |
| Bone-in drumstick | Similar profile to thigh, higher collagen density, good for batching | 24–26 min | Beginner |
Start with bone-in, skin-on. The skin protects the underlying meat from overcooking, the bone conducts heat toward the center, and the result is the most forgiving of the four. Move to boneless variations once the technique is calibrated to your air fryer model.
Timing Guide by Weight and Cut
| Cut | Weight per Piece | Temp | Total Time | Flip At |
|---|---|---|---|---|
| Bone-in, skin-on thigh | 150–180g | 400–425°F | 20–22 min | 10 min |
| Bone-in, skin-on thigh | 190–230g | 400–425°F | 22–25 min | 12 min |
| Boneless, skin-on thigh | 130–160g | 400–425°F | 16–18 min | 8 min |
| Boneless, skinless thigh | 100–140g | 380–400°F | 12–14 min | 6 min |
| Bone-in drumstick | 100–150g | 400–425°F | 24–26 min | 12 min |
Always verify with a thermometer: Timing varies significantly between air fryer models due to wattage, internal volume, and basket design. Internal temperature — 175–190°F (79–88°C) in the thickest part of the meat, away from the bone — is the only reliable reference. Treat the timing above as a calibration guide for your first cook.
The Key Technique Checklist
In order of impact. The first two steps determine the majority of the result.
1. Pat every surface completely dry—including the underside and under the skin.
Use two or three sheets of paper towel per thigh and press firmly on all surfaces. Slide a sheet under the skin and press directly on the flesh. Any visible moisture delays browning and produces pale, yielding skin. Run your finger across the surface: if it drags without slipping, it is dry enough.
Why: Moisture on the skin must evaporate before the surface temperature can climb past 150°C (300°F). Thorough drying eliminates this evaporative phase, allowing browning to begin immediately.
2. Preheat the basket at 400–425°F for 3–5 minutes before loading.
A cold basket means the first phase of cooking is spent heating the surface rather than browning the chicken. This step is consistently skipped and accounts for the majority of pale-skin results. It takes five minutes and makes a measurable difference every time.
Why: A preheated basket initiates surface browning before residual moisture can escape as steam. Steam prevents crust formation.
3. Work the rub under the first flap of skin as well as over it.
The skin is the barrier—seasoning applied only to the exterior surface stays there. Lifting the skin at the thickest point and working paste directly onto the flesh below doubles the flavor contact without tearing the skin off entirely.
Why: Flavor penetration through fat is limited. Working seasoning under the skin delivers taste directly to the meat surface.
4. Place skin-side down and do not open the basket during the first 10–12 minutes.
Opening drops internal temperature and interrupts fat rendering, producing uneven browning. Set a timer and commit to leaving it closed.
Why: The first phase is dedicated to rendering subcutaneous fat downward through the skin. Interrupted heat disrupts this process.
5. Flip once at the designated time, and finish skin-side up.
The second phase directs convected air onto the now-thinned skin surface. This is where the crackle develops. Flipping earlier shortcuts fat rendering and produces skin that is browned on the surface but thick and yielding underneath.
Why: Fat rendering and crisping are two separate phases with different objectives. Both are required.
6. Pull at 175–190°F in the thickest part of the meat, not near the bone.
The bone conducts heat and reads higher than surrounding muscle. Position the probe parallel to the bone and in the thickest section of flesh. Pulling at 165°F is safe but produces a tighter, less yielding result than the collagen conversion that happens above 175°F.
Why: Temperature determines collagen denaturation. Below 175°F, collagen is semi-solid. Above 175°F, it becomes gelatin.
7. Rest for 5 minutes before cutting or serving.
Heat drives moisture toward the center of the meat during cooking. Resting allows it to redistribute through the muscle fibers. Cutting immediately wastes the juiciness you just spent 25 minutes building.
Why: Moisture distribution improves bite texture and perceived juiciness.
The first time I cooked these skin-side down the whole way—thinking uninterrupted contact with the basket would produce more crust—the skin came out crackly on the inside and pale on the outer face. The flip matters. The first phase renders the fat through the skin; the second phase crisps what’s left of it. Both phases are doing different jobs.
Rub Variations — Same Method, Different Profile
The base technique does not change. Swap the spice blend and every variation cooks identically—same temperature, same timing, same two-phase approach.
Lemon Pepper Parmesan
Lemon pepper seasoning, extra cracked black pepper, garlic powder. Scatter 15g finely grated Parmesan over the skin in the last 3 minutes of cooking—it firms directly into the surface as it browns, adding a second layer of crunch. Finish with a squeeze of fresh lemon.
~0.5g Net Carbs
Best for: Lighter weeknight dinner
Buffalo
Cook the base rub (omit paprika). Toss finished thighs immediately—while still hot—in 2 tbsp melted butter combined with 2 tbsp Frank’s RedHot. The heat of the skin emulsifies the sauce on contact. Serve with celery and blue cheese.
~1g Net Carbs
Best for: Game day, higher fat macro days
Za’atar
Za’atar, garlic powder, sumac, olive oil as the fat. Finish with a squeeze of fresh lemon after plating—sumac’s acidity cuts through rendered fat and lifts the dish in the way a sauce would on a heavier cut.
~0.5g Net Carbs
Best for: Meal prep—holds better refrigerated
Chipotle-Lime
Chipotle powder, cumin, garlic powder, lime zest worked into the paste. Finish with a small squeeze of fresh lime and chopped cilantro after cooking. Do not add lime juice to the raw rub—acid draws moisture from the skin before cooking begins.
~0.5g Net Carbs
Best for: Sliced over cauliflower rice with avocado
Spice Freshness: Smoked paprika and cumin oxidise quickly once opened. If a spice has been in your cupboard for more than 6 months and doesn’t release a strong aroma when pinched, it will contribute colour but very little flavour. Buy small quantities from a high-turnover store and replace regularly.
What to Serve With This
Chicken thighs carry fat—pairings that introduce acidity or textural contrast produce a complete plate rather than a heavy one.
- Garlicky green beans with toasted almonds: The slight bitterness of green beans cuts through rendered chicken fat, and almonds add a dry crunch that contrasts with the juicy dark meat. Cook in the air fryer at 375°F for 8 minutes immediately after the thighs rest—no separate pan needed.
- Shaved cabbage slaw with dill and white wine vinegar: The acidity in the dressing lifts fat from the palate and refreshes between bites. Make it 30 minutes ahead and refrigerate; it improves as the cabbage softens slightly and the dressing penetrates.
- Cauliflower mash with butter and chives: A fat-forward pairing for keto macro days where protein and fat are the priority. 200g of cauliflower mash adds approximately 4g net carbs without breaking the macro structure of the meal.
Keto macro note: One thigh (270 cal / 27g protein / 17g fat / 0g net carbs) paired with 200g cauliflower mash and 100g air-fried green beans totals approximately 385 calories, 32g protein, 26g fat, and 4g net carbs—a complete keto dinner within standard daily targets on most protocols.
Meal Prep and Storage
Season raw thighs up to 12 hours ahead and refrigerate uncovered. Salt draws surface moisture initially, which reabsorbs into the meat over time. After 12 hours on an uncovered rack in the refrigerator, the skin is measurably drier than a freshly seasoned thigh—and the crisping result is noticeably better. This is the single most effective prep-ahead step.
Make the dry spice blend in bulk. The ratio scales linearly. Store the dry mix in a sealed jar for up to 6 months—combine with oil only when ready to cook. Pre-mixed paste with oil goes stale within a day.
Refrigerate cooked thighs for up to 4 days in an airtight container. Cool completely on a wire rack before sealing—trapping steam inside the container softens the skin during storage and cannot be recovered. Reheat at 375°F (190°C) for 5–7 minutes, skin-side up. The air fryer re-crisps the skin in a way that an oven or microwave cannot replicate. Do not cover with foil—trapped steam is the primary reason reheated chicken skin goes soft.
Leftover applications: Pull from the bone and slice cold over a shaved cabbage salad, fold into lettuce wraps with avocado and lime, or chop and toss in buffalo butter for a speedy keto bowl.
Troubleshooting
FAQ
Chicken thighs contain significantly more intramuscular collagen than breast meat. At 165°F (74°C), that collagen is still semi-solid—the meat is safe but has a tighter, slightly fibrous texture. Above 175°F (80°C), collagen converts fully to gelatin, which distributes through the muscle fibers and produces the juicy, yielding bite associated with properly cooked thighs. Dark meat’s higher fat content also means it does not dry out at these temperatures the way lean breast would.
Yes—measurably. Baking powder (aluminum-free) raises the skin’s pH, which accelerates the Maillard reaction and draws moisture from the surface more efficiently during cooking. The result is a thinner, crispier, more deeply browned exterior in the same cook time. Use 1 tsp across 4 thighs. More than this produces an off-flavor. It is not essential—the recipe works without it—but the difference is visible and worth the addition.
Technically yes, but the result is consistently inferior. Frozen thighs release significant moisture as they thaw during the cook—that moisture prevents the skin from drying and crisping. If cooking from frozen is unavoidable: start at 360°F for 8–10 minutes to thaw the surface, drain any pooled liquid from the basket, pat the skin dry, season, and continue at 400–425°F to temperature. Thawing overnight in the refrigerator and cooking from cold is a fundamentally better approach.
Avocado oil has a smoke point of approximately 270°C (520°F)—well above the 200–220°C (400–425°F) cooking temperature. Extra virgin olive oil smokes at 160–190°C depending on acidity and refinement, which means it can oxidise and produce off-flavors at this temperature. Light or refined olive oil (smoke point ~240°C) works as an alternative. Ghee (smoke point ~250°C) is the better choice if the macro split favors fat—it adds a buttery richness that avocado oil does not.
Air fryer wattage and internal volume vary significantly between models. Some run 15–20°F above their display temperature. The only consistent reference point is internal temperature—use a reliable instant-read thermometer, target 175–190°F (79–88°C), and treat the timing in this recipe as a starting reference to adjust from on your first cook.
Your Next Recipe
Crispy Air Fryer Keto Chicken Wings — Cajun Dry Rub—the same dry brine and baking powder principle applied to wings with adjusted timing. If you mastered the collagen target and fat rendering here, wings transfer the technique to a smaller cut with faster total cook time, making them ideal for batch cooking or group serving.
The case against dry brine as a shortcut deserves sharpening. Dry brining is often presented as a faster alternative to wet brining, which is incorrect framing. What actually happens during dry brining is superior: salt penetrates muscle tissue and seasons from the interior outward, while surface moisture loss prepares the exterior for crisping. A wet marinade cannot do both simultaneously because it adds surface moisture that prevents browning. The dry brine is not faster—it is technically correct for achieving both internal seasoning and exterior crispness on this cut.
Did you season the thighs ahead and refrigerate uncovered overnight—and was the crisping result noticeably different from cooking straight from the rub?
More Keto Air Fryer Chicken Recipes
→ Crispy Air Fryer Keto Chicken Thighs — Bone-In, Skin-On
→ Crispy Keto Chicken Wings — Buffalo Style
→ Air Fryer Keto Chicken Breast
→ Pork Rind–Crusted Air Fryer Fried Chicken
→ Keto Chicken Meal Prep — 4 Flavours, 1 Hour
→ Almond Flour–Crusted Keto Chicken Tenders
→ Air Fryer Keto Chicken Shawarma
→ Keto Air Fryer Chicken Parmesan
→ View All Keto Air Fryer Recipes
Printable Recipe Card
Want just the essential recipe details without scrolling through the article? Get our printable recipe card with just the ingredients and instructions.