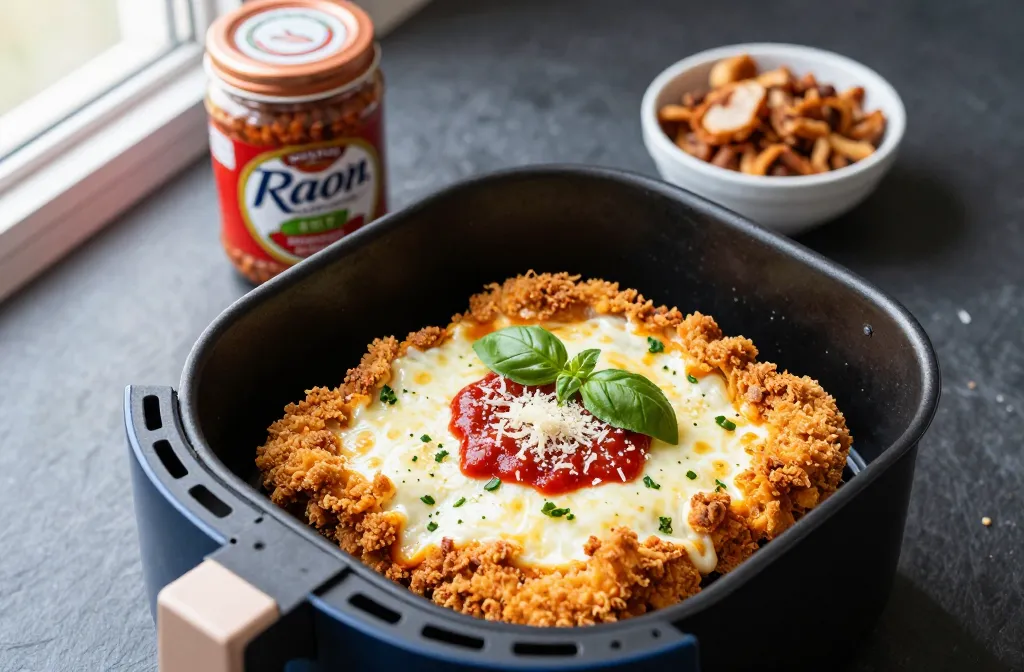
A pork rind crust gives you a genuinely crispy exterior on chicken parmesan — under melted mozzarella and Rao’s marinara — without a gram of flour and in under 20 minutes. The air fryer’s convection heat sets the crust on all sides simultaneously, which is what a conventional oven at the same temperature cannot do. Below: the exact crust technique, a timing guide by cutlet thickness, five tested flavour variations, and every reason the crust falls off and how to stop it.
Keto Air Fryer Chicken Parmesan
Ingredients
Equipment
Method
- Pat chicken completely dry with paper towels. Season both sides lightly with salt and pepper.
- Combine crushed pork rinds, grated Parmesan, garlic powder, onion powder, and Italian seasoning in a shallow bowl.
- Beat eggs with water in a second shallow bowl.
- Dip each cutlet in the egg wash, then press firmly into the pork rind mixture to coat both sides. Press the crumb in — do not dust it on.
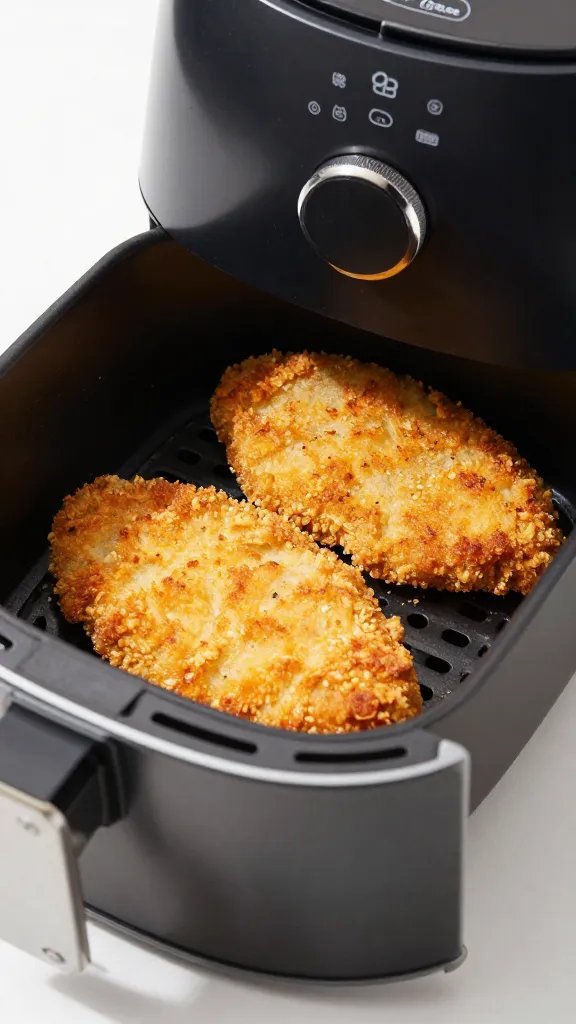
- Preheat air fryer to 380°F (193°C) for 3 minutes. Spray the basket lightly with olive oil.
- Place cutlets in a single layer. Spray tops lightly with olive oil. Cook for 7–9 minutes, flipping once at the halfway point, until the crust is golden and internal temperature reaches 160°F (71°C).
- Spoon 2 tbsp Rao’s over each cutlet. Lay mozzarella slices on top and add a pinch of Parmesan. Return to the air fryer for 1–2 minutes until cheese is melted and chicken reaches 165°F (74°C).
- Rest for 2 minutes before serving. Top with fresh basil if using.
Notes
Taste the crumb before seasoning; some brands run salty.
Why This Recipe Works
Four things separate this from a mediocre keto chicken parmesan — and understanding them means you can fix any problem that comes up.
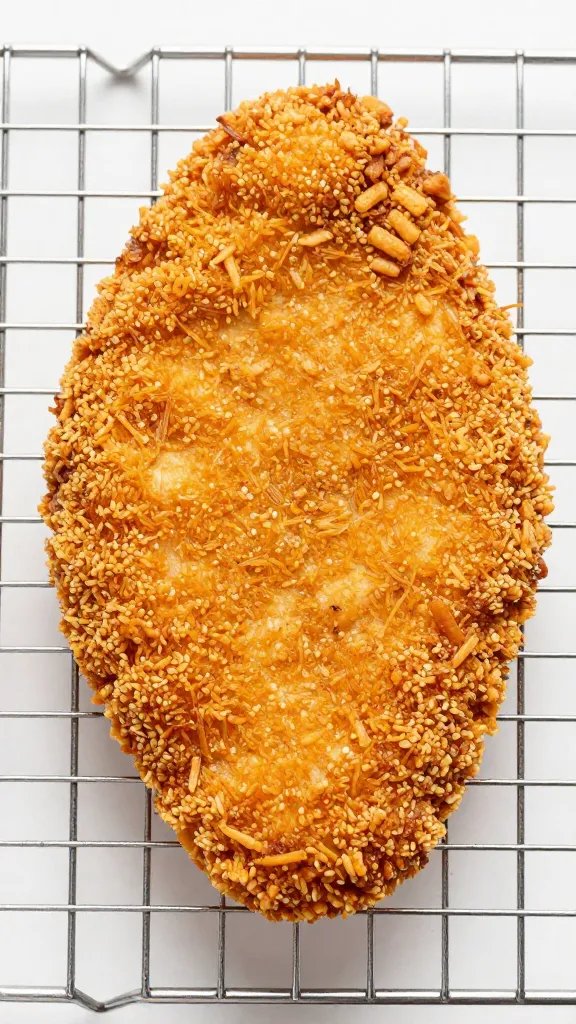
Pork rinds crust via protein, not starch. Standard breadcrumbs rely on starch to brown. Crushed pork rinds are almost entirely protein and fat — they brown through the Maillard reaction at the same air fryer temperatures, producing a crust with the same colour and crunch without any carbohydrate contribution. The key is grind size: fine crumb creates maximum surface contact with the egg wash and maximum browning; large chunks create gaps that fall away during cooking.
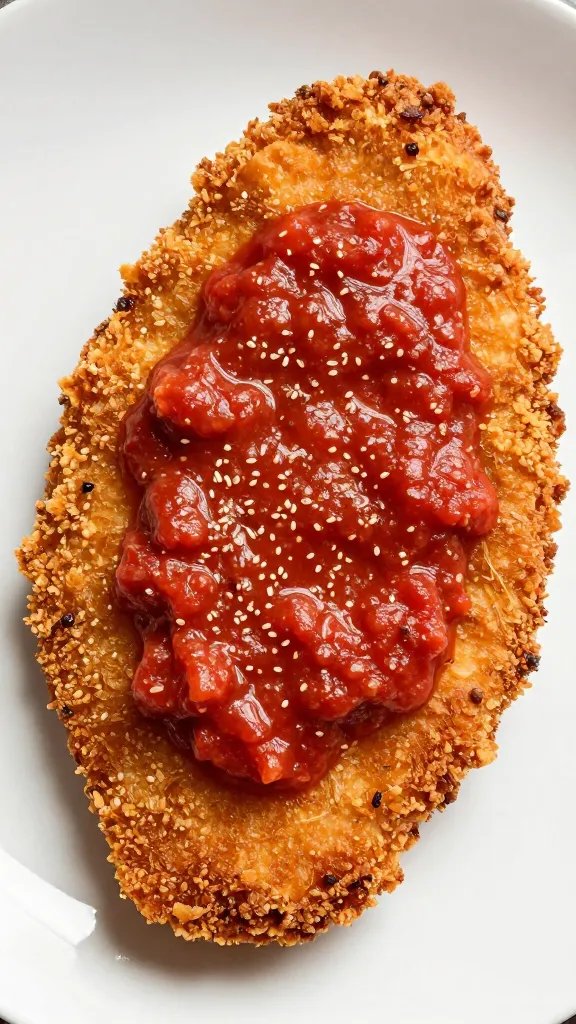
Rao’s Marinara has 4g sugar per half-cup versus 12–15g in most supermarket jars. That difference matters for two reasons: it keeps the dish within a strict keto carb budget, and it means the sauce caramelises under the mozzarella rather than steaming it — giving you a set topping rather than a pool of liquid.
Air fryer convection heat sets the crust on all sides simultaneously. A conventional oven heats from above and below, leaving the sides of the cutlet exposed and soft. The air fryer’s circulating air reaches the entire surface at once, which is why the crust holds its structure rather than softening where it contacts the basket.
The two-minute rest allows steam to exit through the crust. Cutting immediately traps steam inside the coating and softens it from the inside out. Two minutes is enough for that steam to escape and the crust to firm up completely.
On pressing the crumb: Egg wash is adhesive, not a coating. Press the pork rind mixture firmly onto each side and hold for three seconds. A light dusting will fall off in the air fryer — the crumb needs mechanical contact with the egg surface to bond during cooking.
Which Cut Is Right for You?
Chicken parmesan is most commonly made with breast, but the cut you choose changes the cook time, the margin for error, and the final texture.
| Cut | Best For | Cook Time | Difficulty |
|---|---|---|---|
| Breast cutlet (pounded to ½ inch) | Classic result, fastest cook, leanest macro | 7–9 min | Beginner |
| Pre-sliced thin cutlets (store-bought) | No prep required, consistent thickness | 6–8 min | Beginner |
| Boneless thigh (pounded to ½ inch) | More forgiving, stays juicy at higher temps | 9–12 min | Beginner |
| Thick breast (not pounded) | Not recommended — uneven cooking, crust burns before centre reaches temp | 12–15 min | Intermediate |
Start with pounded breast cutlets or pre-sliced thin cutlets. They cook in under 9 minutes, require no technique adjustment, and give you the leanest macro profile. If you prefer thighs for flavour and fat content, pound them to an even ½ inch — the cook time is only marginally longer and the result is excellent.
Timing Guide by Cutlet Thickness
| Thickness | Initial Cook | After Topping | Pull Temp |
|---|---|---|---|
| ¼ inch (very thin) | 5–6 min, flip once | 1 min | 160°F (71°C) |
| ½ inch (standard) | 7–9 min, flip once | 1–2 min | 160°F (71°C) |
| ¾ inch (thick) | 10–12 min, flip once | 2 min | 160°F (71°C) |
| Boneless thigh (½ inch) | 9–12 min, flip once | 1–2 min | 165°F (74°C) |
All times assume a preheated air fryer at 380°F (193°C) and a single layer in the basket. Stacking or overlapping adds 3–4 minutes and produces uneven browning — batch cook if needed. Pull at 160°F; carryover heat during the topping stage brings the breast to the safe 165°F threshold.
The Five Technique Points That Determine the Crust
In order of impact. Get the first two right and the rest follows.
- Pat completely dry before coating. Surface moisture turns to steam in the air fryer and pushes the crust away from the chicken. Paper towels and 30 seconds of pressure are not optional — they determine whether the crust adheres or peels.
- Crush pork rinds to fine crumb, not rough chunks. Large pieces have minimal surface contact with the egg wash and detach during cooking. A food processor gives the most consistent result; a zip-lock bag and rolling pin works but requires two passes to eliminate large pieces. The target texture is close to panko — uniform, not powdery.
- Press the crumb on, hold for three seconds per side. Egg wash creates adhesion only under pressure. A light coating application leaves gaps; a pressed application creates a continuous surface that holds under convection airflow.
- Spray the crust with olive oil before cooking. Pork rinds contain their own fat, but the outer surface of the crumb needs oil contact to brown evenly. Without spray, the tips of the crumb brown correctly but the base stays pale.
- Top with sauce and cheese only after the crust is set. Adding Rao’s before the crust is fully golden introduces moisture that prevents it from crisping further. Cook to golden first — then sauce, then melt for 1–2 minutes.
The first time I made this, I applied the crumb like a coating rather than pressing it in. Half of it was on the basket floor, not the chicken. Three seconds of firm pressure per side — not a light press — is what actually bonds it. I have not had it fall off since.
Five Variations Worth Making
All use the same base technique. Carb counts are per cutlet including Rao’s and mozzarella.
Spicy Arrabbiata
Swap Rao’s Marinara for Rao’s Arrabbiata and add ½ tsp crushed red pepper flakes to the pork rind mixture. The heat builds through the crust and intensifies under the mozzarella. Works best with breast cutlets where the milder meat contrasts the spice.
~5g net carbs Best for: heat lovers, weeknightsLemon-Herb
Add 1 tsp lemon zest and 1 tbsp finely chopped fresh parsley to the pork rind crumb. Finish with a squeeze of lemon over the mozzarella after the topping stage. Lightens the dish considerably — a better match for zoodles or a shaved zucchini salad than the classic pairing.
~5g net carbs Best for: lighter meals, summerSmoky Paprika
Add 1 tsp smoked paprika to the crumb mixture. The smokiness reads as depth rather than BBQ flavour against the marinara — it pulls the dish closer to Southern Italian rather than American-Italian. Use with thigh cutlets for a richer result.
~5g net carbs Best for: thigh cutlets, entertainingDouble Cheese (Provolone Layer)
Add one thin slice of provolone directly on the crust before the mozzarella. Provolone melts at a lower temperature than mozzarella and creates a stringy base layer that anchors the top cheese. Adds roughly 1g fat and negligible carbs per serving.
~5g net carbs Best for: entertaining, cheese pullDairy-Free
Omit Parmesan from the crust and replace with 1 tbsp nutritional yeast. Top with dairy-free mozzarella shreds — add 30 seconds to the melt time as these shreds take longer to soften than fresh mozzarella. The pork rind crust holds exactly the same; only the topping changes.
~4g net carbs Best for: dairy-free ketoWhat to Serve With This
The chicken itself runs around 475 calories and 24g fat — most pairings should add volume and contrast without pushing the total meal into heavy territory.
- Zoodles with garlic and Parmesan: The mild base absorbs the extra sauce on the plate and adds bulk without carbs. Sauté briefly in olive oil with one crushed garlic clove — overcooking zoodles produces water that dilutes the dish. Total meal adds roughly 3g net carbs and 8g fat.
- Roasted broccoli with chilli flakes: The slightly bitter char on broccoli cuts through the richness of the mozzarella. Toss in olive oil, roast at 400°F for 12 minutes alongside the chicken (separate oven tray), finish with chilli flakes and lemon. Adds 4g net carbs per cup.
- Cauliflower rice, butter-finished: For a heavier meal — dinner party or post-training — cauliflower rice finished with butter and a handful of Parmesan sits under the chicken and catches the sauce. Add 5g net carbs per cup. Total meal sits around 550–580 calories.
Total meal macros (chicken + zoodles): Approximately 8g net carbs | 48g protein | 30g fat | 510 calories. With roasted broccoli: 9g net carbs | 47g protein | 32g fat | 520 calories.
Meal Prep and Storage
The crust is the only component that degrades over time. Sauce and mozzarella can be applied and melted fresh at reheating — the crust itself stores well for 3–4 days in the fridge.
To batch cook: Cook the crusted cutlets fully, then cool completely on a wire rack before refrigerating. Do not stack — the crust on the bottom piece will soften against the chicken above it. Store in a single layer or separated by parchment.
To reheat: Air fryer at 350°F for 3–4 minutes until the crust is crisp again. Then spoon Rao’s and mozzarella on top and melt for 1–2 minutes. This method restores essentially the same texture as the original cook. Reheating in the microwave with sauce and cheese already applied produces a soft crust — avoid it.
To prep coated cutlets in advance: Coat the chicken, place on a wire rack over a tray, and refrigerate uncovered for up to 4 hours before cooking. The cold air firms the egg wash surface and improves crust adhesion — this is the method to use if the crust has been falling off at room temperature prep.
Freezing: Freeze cooked crusted cutlets (unsauced) in a single layer, then transfer to a bag once solid. Reheat from frozen at 370°F for 7–9 minutes, then apply sauce and mozzarella and melt for 2 minutes. Quality is slightly lower than fresh — the crust softens at the base — but it is a workable freezer meal.
Troubleshooting

Frequently Asked Questions
Almond flour browns through a different mechanism — it contains more moisture and a higher proportion of naturally occurring oils, which means it can go from pale to burnt quickly in an air fryer without a reliable browning window. Crushed pork rinds are almost entirely protein and fat with very low moisture content, giving you a predictable 7–9 minute window to golden without burning. They also hold their texture under the mozzarella topping; almond flour crusts tend to soften when the sauce contacts them during the second cook stage.
Yes — and the crust actually benefits from it. Refrigerating coated cutlets uncovered on a wire rack overnight allows the egg wash to dry and form a firmer bond with the crumb. The result is a crust that holds together under convection airflow more reliably than one cooked immediately after coating. Cover loosely with plastic wrap only if the fridge is particularly dry — you want air circulation, not complete sealing.
Any marinara under 6g sugar per half-cup works from a keto standpoint. The reason Rao’s performs better than most alternatives is flavour concentration — it is made with whole peeled tomatoes and has a significantly lower water content than cheaper jarred sauces. Lower water content means less steam under the mozzarella during the topping stage, which is the difference between a set, melted topping and a loose, wet one. If you use a more dilute sauce, spoon it on sparingly to compensate.
Two standard ½-inch cutlets fit side by side in most 4–6 quart basket air fryers with enough clearance for air circulation. If the edges are touching, that contact point will not brown — either trim slightly or cook one at a time. In a larger drawer-style or oven air fryer, four cutlets is achievable in one batch. The topping stage with sauce and mozzarella works on multiple cutlets simultaneously — the second cook only takes 1–2 minutes regardless of how many pieces are in the basket.
Taste the crushed crumb before adding any seasoning. If the pork rinds are already well-seasoned, omit the salt from the recipe entirely and reduce the garlic powder to ½ tsp. The Parmesan in the crumb also carries significant salt — the combination of heavily salted rinds and full-fat Parmesan can push the crust into unpleasantly salty territory. Plain, unflavoured rinds give you the most control and are the preferred choice for this recipe.
Your Next Recipe
Pork Rind Crusted Air Fryer Fried Chicken — uses the same crumb technique with a brine step that takes the crust adhesion and chicken moisture further than the parmesan version.
If you want to build on what you learned here, that recipe is the natural next step: same pork rind methodology, longer prep, noticeably different result at the table — and it explains exactly why the brine matters for crust performance in a way that will also improve how you make this recipe next time.
Classic American-Italian chicken parmesan was built around a breadcrumb crust for structural reasons as much as flavour — a thick starch coating held moisture in during deep frying and gave the sauce something to grip. The pork rind version removes that starch without removing the function: protein browns, fat carries flavour, and the egg wash gives the sauce its anchor. The result is not a compromise version of chicken parmesan. It is the same dish solved differently.
Which cut did you use — breast cutlet or thigh — and did you need to adjust the cook time to get the crust where you wanted it?
More Keto Air Fryer Chicken Recipes
Printable Recipe Card
Want just the essential recipe details without scrolling through the article? Get our printable recipe card with just the ingredients and instructions.