If cheesecake sounds like a project, these air fryer mini cheesecakes will change your mind. They’re creamy, rich, and surprisingly easy—no water bath, no waiting hours for a full-size cake to bake. The air fryer cooks them evenly and fast, so you can go from craving to dessert in under an hour.
They’re perfect for parties, date nights, or when you just want a small treat without a big fuss. Plus, they’re customizable, so you can top them however you like.
What Makes This Recipe So Good

- Quick and convenient: The air fryer trims the cook time to just minutes per batch.
- Foolproof texture: You get a silky, creamy filling without the stress of a water bath.
- Perfectly portioned: Individual cheesecakes are easy to serve and store.
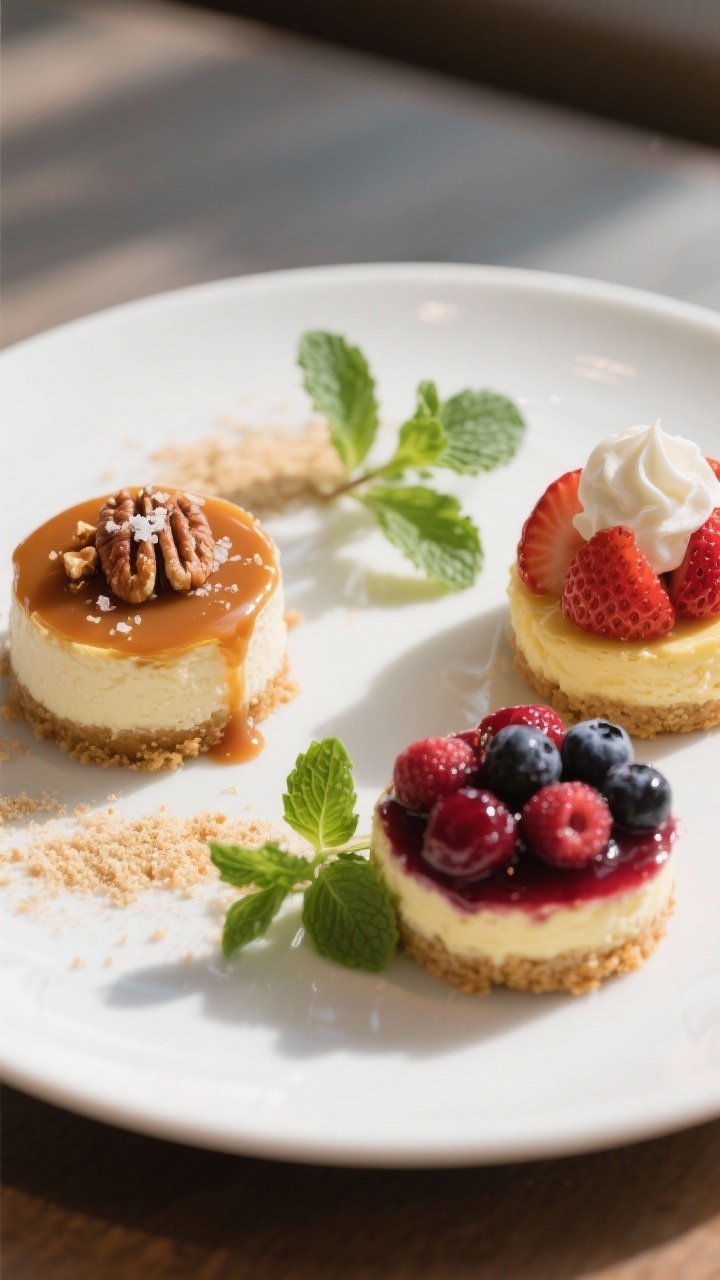
- Endlessly customizable: Switch up the crust, add swirls, or top with fruit, chocolate, or caramel.
- Minimal equipment: All you need are a muffin pan that fits in your air fryer or silicone muffin cups.
Ingredients
For the crust:
- 1 cup graham cracker crumbs (or digestive biscuit crumbs)
- 2 tablespoons granulated sugar
- 4 tablespoons unsalted butter, melted
- Pinch of salt
For the cheesecake filling:
- 16 ounces (450 g) cream cheese, softened to room temperature
- 1/2 cup granulated sugar
- 2 large eggs, room temperature
- 1/3 cup sour cream (or plain Greek yogurt)
- 1 teaspoon vanilla extract
- 1 tablespoon lemon juice (optional, for brightness)
- Pinch of salt
Toppings (optional):
- Fresh berries, berry compote, or cherry pie filling
- Caramel sauce or chocolate ganache
- Lemon curd
- Crushed cookies or nuts
Instructions

- Prep your air fryer and pans: Line a 12-cup muffin pan with paper liners, or use silicone muffin cups. Make sure they fit in your air fryer basket.
Preheat the air fryer to 300°F (150°C) for 3–5 minutes.
- Make the crust: In a bowl, mix graham crumbs, sugar, melted butter, and a pinch of salt until the mixture looks like damp sand. It should hold together when pressed.
- Press the crust: Divide the mixture evenly among the liners (about 1 tablespoon per cup). Press firmly with the back of a spoon or the bottom of a small glass.
Air fry the crusts at 300°F (150°C) for 3–4 minutes. Remove and cool slightly.
- Beat the filling: In a mixing bowl, beat the softened cream cheese with sugar until smooth and lump-free, about 1–2 minutes. Add eggs one at a time, mixing on low until just combined.
Add sour cream, vanilla, lemon juice (if using), and salt. Mix on low until smooth. Avoid overmixing.
- Fill the cups: Spoon the filling over the crusts, filling each liner about 3/4 full.
Tap the pan gently on the counter to pop surface bubbles.
- Air fry in batches: Place the pan or cups in the air fryer basket, leaving space for air to circulate. Cook at 300°F (150°C) for 10–13 minutes, or until the centers are set around the edges but still slightly wobbly in the middle.
- Rest in the basket: When time is up, leave the cheesecakes in the air fryer (power off, basket closed) for 5 minutes. This gentle rest helps prevent cracking.
- Cool completely: Remove and cool to room temperature in the pan.
Then chill in the fridge for at least 2 hours, or until fully set.
- Add toppings and serve: Peel off liners, add your favorite toppings, and enjoy.
Storage Instructions
- Refrigerator: Store in an airtight container for up to 5 days.
- Freezer: Freeze without toppings. Wrap each cheesecake in plastic, then place in a freezer bag or container. Freeze for up to 2 months.
Thaw overnight in the fridge.
- Make ahead: Bake the day before and add toppings just before serving to keep them fresh.
Health Benefits
- Portion control: Mini cheesecakes offer built-in serving sizes, which can help manage calories.
- Protein boost: Cream cheese and eggs provide protein that helps with satiety.
- Customizable sweetness: You can reduce the sugar slightly or use a less sweet topping like fresh fruit.
- Air fryer efficiency: The air fryer uses less energy than a full oven and keeps your kitchen cooler.
- Better ingredient choices: Use Greek yogurt, a lighter cream cheese, or a nut-based crust for a different nutrition profile.
Common Mistakes to Avoid
- Using cold ingredients: Cold cream cheese leads to lumps. Soften to room temperature for a silky batter.
- Overmixing: Too much air in the batter can cause cracks. Mix on low and stop once smooth.
- Overbaking: Cheesecakes should jiggle slightly in the center.
If you wait for them to be firm, they’ll turn dry.
- Skipping the rest: Those 5 minutes resting in the warm basket help prevent sudden temperature shock and cracking.
- Overfilling liners: Filling more than 3/4 full can cause overflow and uneven cooking.
- Packing the basket too tightly: Air needs to circulate. Bake in batches if needed.
Recipe Variations
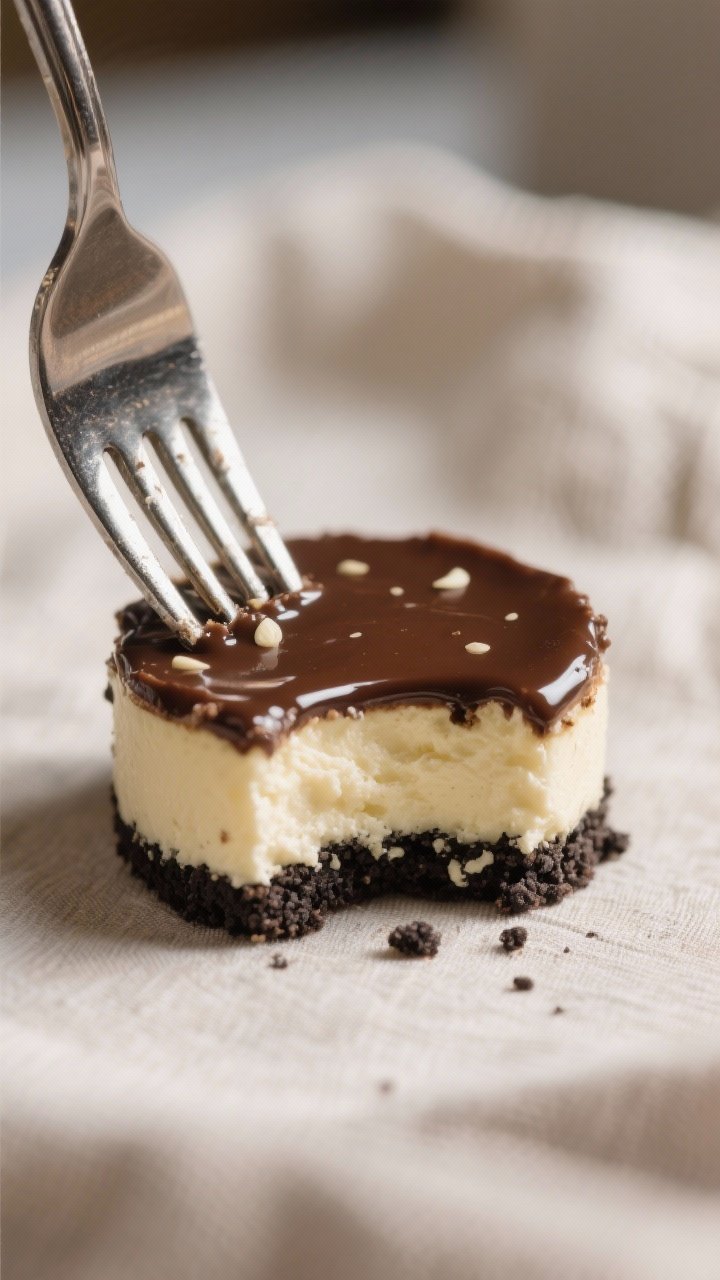
- Chocolate swirl: Warm 1/4 cup chocolate hazelnut spread or melted chocolate. Dollop on top of each filled cup and swirl with a toothpick.
- Lemon blueberry: Add 1 tablespoon lemon zest to the batter and press a few fresh blueberries into each cup before baking.
- Salted caramel pecan: Top chilled cheesecakes with caramel sauce and chopped toasted pecans.
Finish with a light sprinkle of flaky salt.
- Oreo crust: Swap graham crumbs for crushed chocolate sandwich cookies. Skip the added sugar in the crust.
- Strawberry shortcake: Use vanilla wafer crumbs for the crust and top with sliced strawberries and a little whipped cream.
- Pumpkin spice: Mix 1/3 cup pumpkin puree and 1 teaspoon pumpkin spice into the batter. Increase cook time by 1–2 minutes if needed.
- Lower sugar: Reduce sugar in the filling to 1/3 cup and top with fresh fruit instead of sweet sauces.
FAQ
Can I bake these without liners?
Yes, if you use silicone muffin cups or a silicone muffin pan.
Lightly grease them and let the cheesecakes cool fully before popping them out. Paper liners make serving and cleanup easier, though.
What if I don’t have a muffin pan that fits my air fryer?
Use individual silicone cups placed directly in the basket. Arrange them with space between each cup to allow airflow and even cooking.
How do I know when the cheesecakes are done?
The edges should look set, and the centers should have a slight jiggle when you gently shake the pan.
They’ll firm up as they cool. If they look glossy and very wet, give them another minute or two.
Can I make them gluten-free?
Yes. Use gluten-free graham crackers or almond flour for the crust.
If using almond flour, add an extra pinch of salt and a touch more butter to help it hold together.
Why did my cheesecakes crack?
Common causes are overmixing, overbaking, or cooling too quickly. Mix on low, stop baking while the centers still wobble, and let them rest in the warm basket before cooling at room temperature.
Can I double the recipe?
Absolutely. Cook in batches and keep an eye on timing, since crowded baskets can affect airflow and cook time.
What’s the best topping for serving right away?
Fresh berries or a quick berry compote are great choices.
They add brightness and cut through the richness without making the tops soggy.
Wrapping Up
These air fryer quick mini cheesecakes deliver classic cheesecake flavor with a fraction of the effort. They’re smooth, rich, and adaptable to any occasion or topping you love. Keep a batch in the fridge for easy desserts throughout the week, or whip them up for guests on short notice.
Once you try them, your air fryer might become your go-to cheesecake tool.

Air Fryer Quick Mini Cheesecakes - A Fast, Creamy Dessert Anyone Can Make
Ingredients
Method
- Prep your air fryer and pans: Line a 12-cup muffin pan with paper liners, or use silicone muffin cups. Make sure they fit in your air fryer basket.Preheat the air fryer to 300°F (150°C) for 3–5 minutes.
- Make the crust: In a bowl, mix graham crumbs, sugar, melted butter, and a pinch of salt until the mixture looks like damp sand. It should hold together when pressed.
- Press the crust: Divide the mixture evenly among the liners (about 1 tablespoon per cup). Press firmly with the back of a spoon or the bottom of a small glass.Air fry the crusts at 300°F (150°C) for 3–4 minutes. Remove and cool slightly.
- Beat the filling: In a mixing bowl, beat the softened cream cheese with sugar until smooth and lump-free, about 1–2 minutes. Add eggs one at a time, mixing on low until just combined.Add sour cream, vanilla, lemon juice (if using), and salt. Mix on low until smooth. Avoid overmixing.
- Fill the cups: Spoon the filling over the crusts, filling each liner about 3/4 full.Tap the pan gently on the counter to pop surface bubbles.
- Air fry in batches: Place the pan or cups in the air fryer basket, leaving space for air to circulate. Cook at 300°F (150°C) for 10–13 minutes, or until the centers are set around the edges but still slightly wobbly in the middle.
- Rest in the basket: When time is up, leave the cheesecakes in the air fryer (power off, basket closed) for 5 minutes. This gentle rest helps prevent cracking.
- Cool completely: Remove and cool to room temperature in the pan.Then chill in the fridge for at least 2 hours, or until fully set.
- Add toppings and serve: Peel off liners, add your favorite toppings, and enjoy.
Printable Recipe Card
Want just the essential recipe details without scrolling through the article? Get our printable recipe card with just the ingredients and instructions.