Roast chicken is one of those meals that feels special without being fussy. With an air fryer, you get crispy skin and juicy meat in less time than a traditional oven, and without heating up your whole kitchen. This version keeps things classic: simple seasoning, straightforward steps, and big flavor.
Whether it’s a weeknight dinner or a relaxed Sunday meal, this is the kind of recipe you’ll come back to again and again. It’s reliable, adaptable, and hard to mess up.
Why This Recipe Works
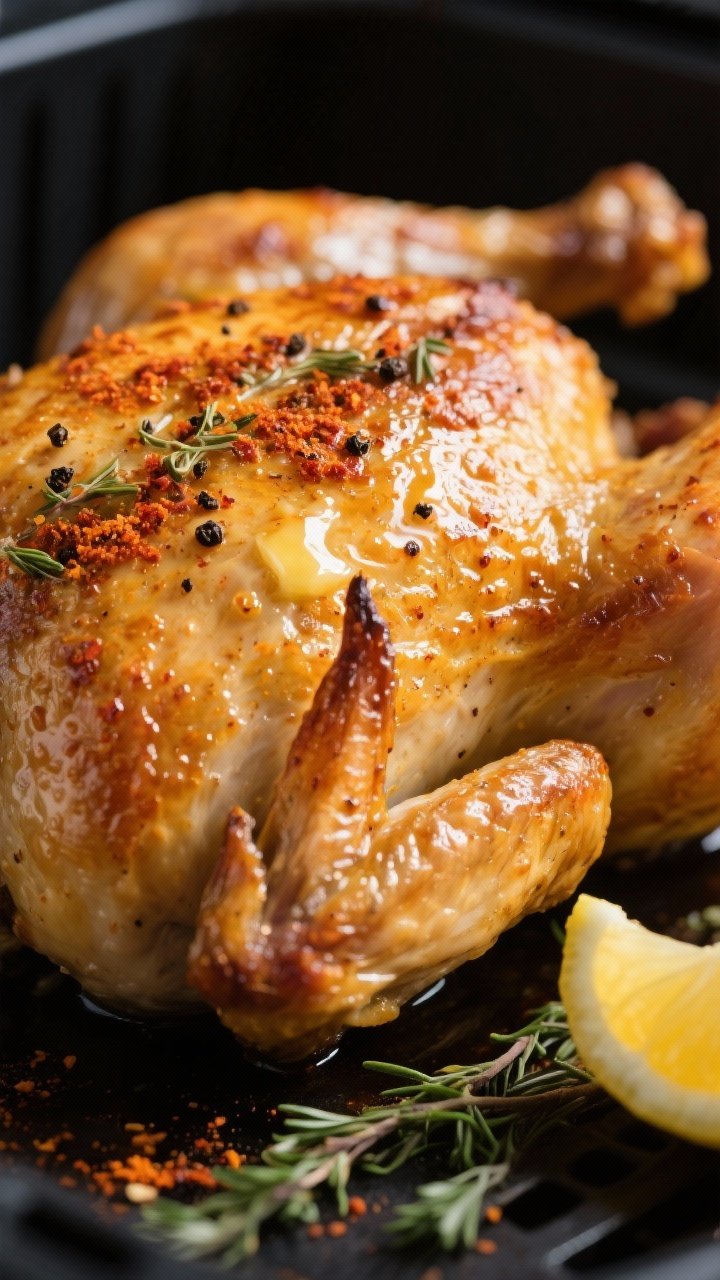
The air fryer circulates hot air around the chicken, which helps the skin crisp up beautifully while keeping the meat tender and moist. A quick dry brine with salt draws out moisture from the skin and seasons the meat all the way through.
Adding a bit of oil helps the seasonings stick and boosts browning. Cooking the bird breast-side down first protects the delicate white meat, then flipping near the end locks in juiciness while finishing the skin. The result is a balanced, classic roast flavor with minimal effort.
Shopping List
- Whole chicken (3.5 to 4.5 pounds), giblets removed
- Kosher salt (about 2 to 2.5 teaspoons)
- Black pepper (1 teaspoon, freshly ground)
- Garlic powder (1 teaspoon)
- Paprika (1 teaspoon; sweet or smoked)
- Onion powder (1/2 teaspoon)
- Dried thyme or rosemary (1 teaspoon)
- Olive oil or avocado oil (1 to 2 tablespoons)
- Lemon (1, optional, for cavity and serving)
- Fresh herbs like thyme, rosemary, or parsley (optional)
- Butter (1 tablespoon, optional, for brushing at the end)
Instructions
- Prep the chicken: Pat the chicken dry with paper towels, inside and out.
Dry skin equals crisp skin, so don’t skip this step.
- Season generously: In a small bowl, mix salt, pepper, garlic powder, paprika, onion powder, and dried herbs. Rub the chicken with oil, then coat evenly with the seasoning blend. If using lemon, tuck half a lemon and a few herb sprigs into the cavity.
- Let it sit (if you have time): For the best flavor and crisp skin, refrigerate the seasoned chicken uncovered for 30 minutes to 12 hours.
Even a short rest helps.
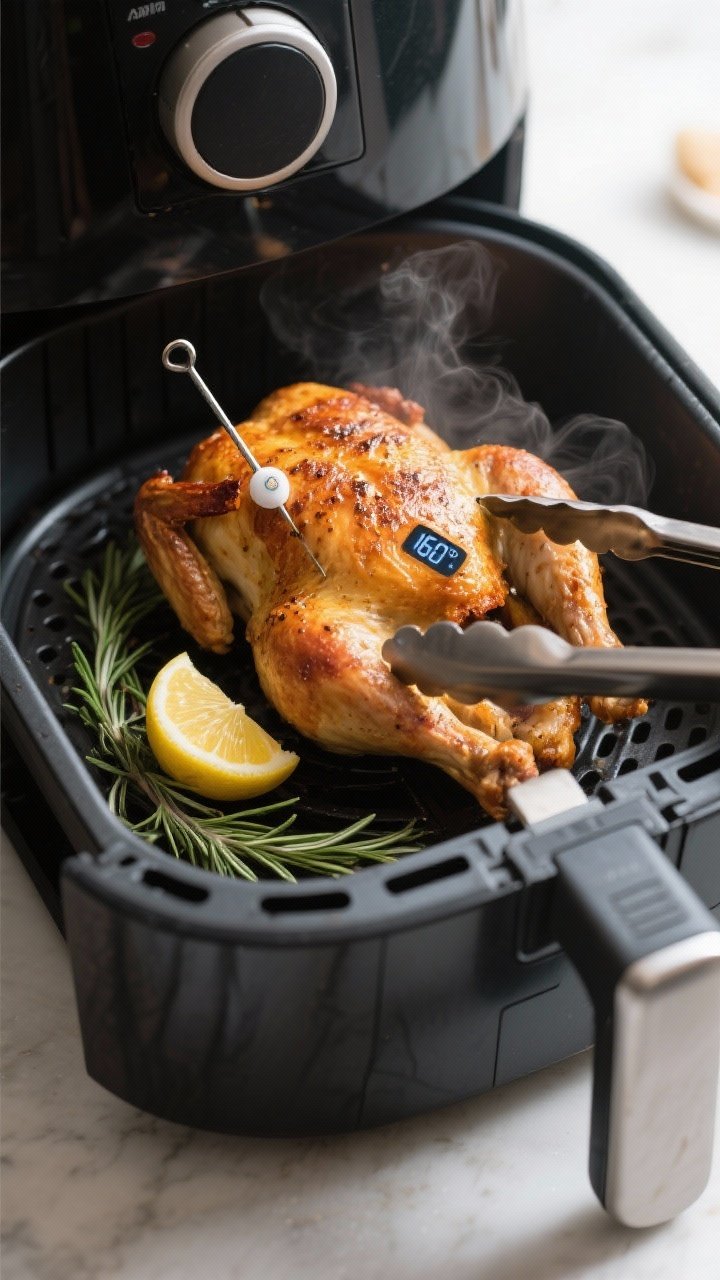
- Preheat the air fryer: Set to 360°F (182°C) for 5 minutes. Preheating helps kickstart browning.
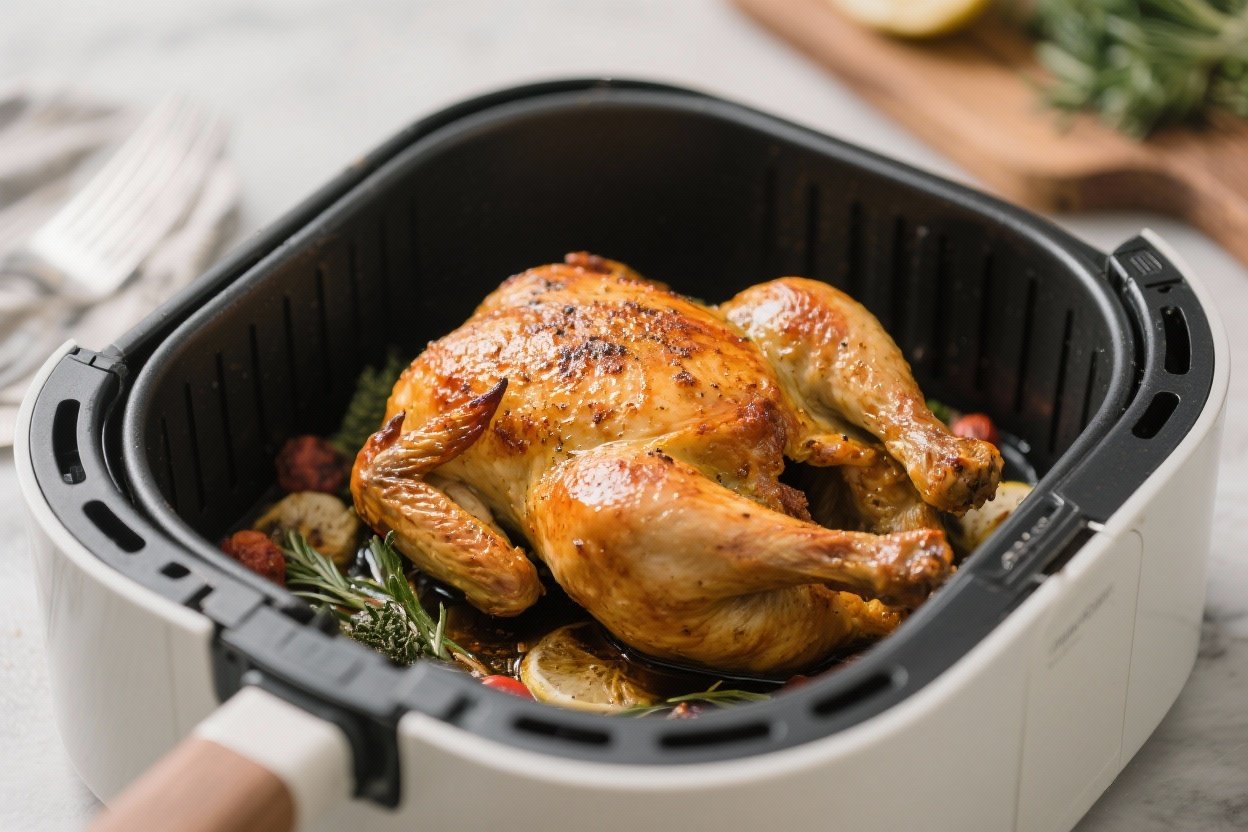
- Load the basket: Place the chicken breast-side down in the air fryer basket. Make sure there’s a little space around it for airflow.
- Cook the first side: Air fry at 360°F (182°C) for 30 minutes.
- Flip carefully: Use tongs and a spatula to flip the chicken breast-side up.
Be gentle to avoid tearing the skin.
- Finish cooking: Air fry for another 20 to 30 minutes, until the thickest part of the breast reaches 160°F (71°C) and the thigh reaches 175°F (79°C). Total time is usually 50 to 60 minutes for a 4-pound bird, but rely on a thermometer.
- Optional butter baste: For extra shine and flavor, brush the skin with melted butter in the last 5 minutes.
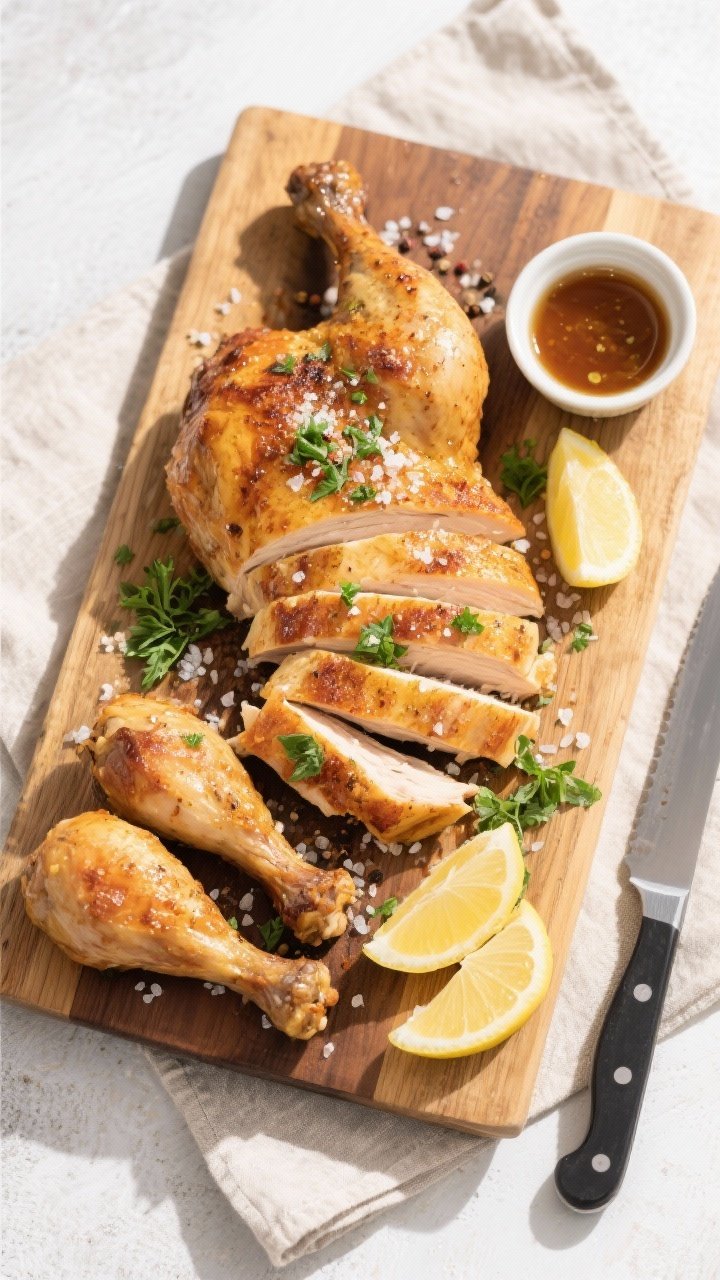
- Rest and carve: Let the chicken rest for 10 to 15 minutes. This keeps the juices in the meat.
Carve and serve with lemon wedges and herbs.
How to Store
Let leftovers cool to room temperature for no more than 1 hour. Store in airtight containers in the fridge for up to 4 days. For best texture, keep the skin separate from any sauces or pan juices.
To freeze, remove the meat from the bones and freeze in portions for up to 3 months.
Wrap tightly to prevent freezer burn. Reheat in a 350°F (175°C) air fryer or oven for 8 to 12 minutes to re-crisp the skin, or microwave gently for quick meals (the skin won’t stay crisp in the microwave).
Why This is Good for You
Whole chicken is a great source of high-quality protein, which supports muscle repair and satiety. Dark meat contains iron and zinc, while the breast is lean and lower in calories.
Cooking in an air fryer uses less oil than pan-frying, helping keep the dish lighter without sacrificing flavor.
Keeping the seasoning simple means you avoid heavy sauces or excess sugar. Add a side of roasted vegetables or a crisp salad, and you’ve got a balanced, satisfying meal that feels comforting and nourishing.
Common Mistakes to Avoid
- Skipping the dry step: Wet skin won’t crisp. Pat dry thoroughly before seasoning.
- Overcrowding the basket: If your air fryer is small, use a smaller chicken.
The air needs space to circulate.
- Not using a thermometer: Visual cues can mislead. Use an instant-read thermometer for perfect doneness.
- Carving too soon: Resting is key to juicy meat. Give it at least 10 minutes.
- Seasoning only the outside: Don’t forget to season the cavity lightly.
It boosts flavor from the inside out.
- Cooking only breast-side up: Starting breast-side down helps protect the white meat and gives better overall results.
Variations You Can Try
- Lemon-Garlic Herb: Add lemon zest, extra garlic, and fresh thyme or rosemary under the skin.
- Smoky BBQ: Use smoked paprika, chili powder, brown sugar, and a touch of cumin. Brush with a thin layer of BBQ sauce in the final 5 minutes.
- Herbes de Provence: Swap in herbes de Provence and add a splash of white wine to the cavity aroma (optional).
- Spicy Peri-Peri: Mix in cayenne, chili flakes, and a little vinegar. Serve with lemon wedges.
- Butterflied (Spatchcocked): For faster cooking, cut out the backbone and flatten the chicken.
Cook at 375°F (190°C) for 35 to 45 minutes, flipping halfway.
FAQ
Can I use a larger chicken?
Yes, but check your air fryer’s capacity. A 5-pound chicken may take 10 to 15 minutes longer. Always cook to temperature, not just time.
Do I need to truss the chicken?
It’s optional.
Trussing makes for a neater shape and slightly more even cooking, but it’s not required in the air fryer. If you skip it, tuck the wing tips under to prevent burning.
What if my air fryer smokes?
High fat can drip and smoke. Place a small piece of bread or a little water in the drawer under the basket to catch drips, or trim excess fat.
Avoid aerosol cooking sprays, which can damage the basket coating and smoke more.
Can I cook from frozen?
For food safety and even cooking, it’s best to thaw the chicken completely in the fridge. If you must cook from partially frozen, expect a longer cook time and check temps in multiple spots.
How do I keep the breast from drying out?
Start breast-side down, don’t overcook, and rest the bird before carving. You can also rub a little butter under the breast skin before cooking for extra moisture.
What should I serve with it?
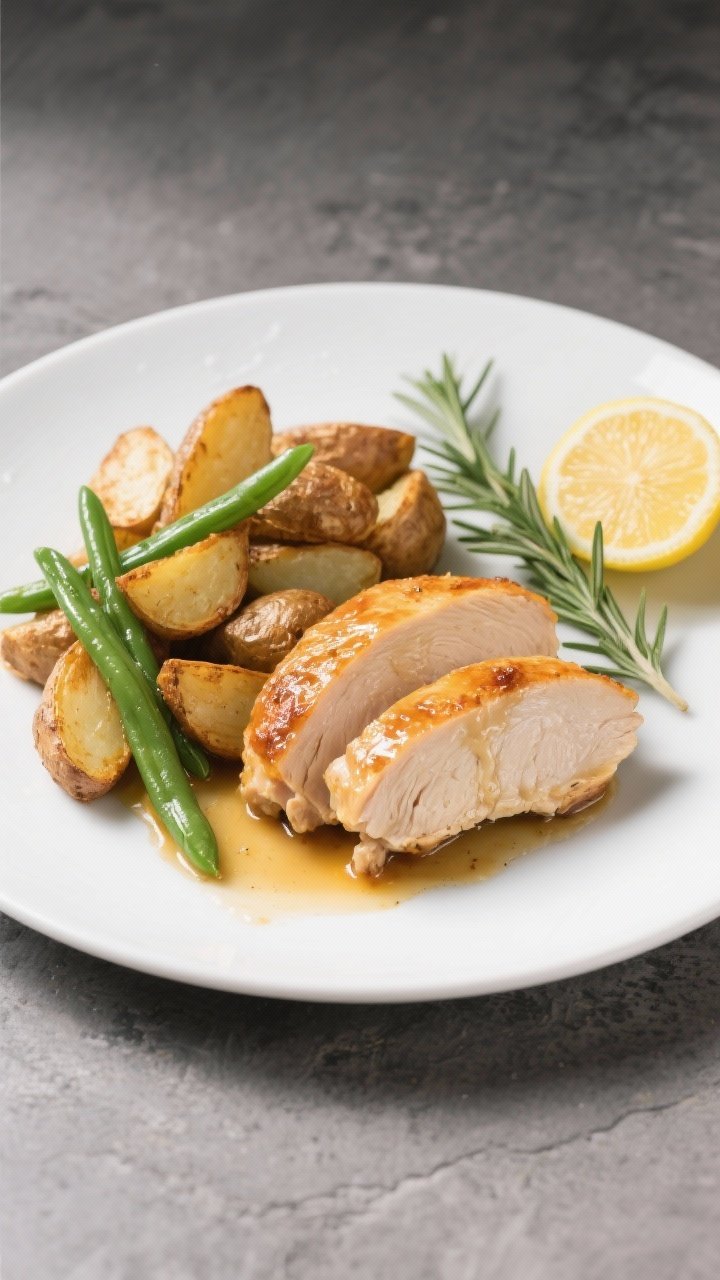
Roasted potatoes, green beans, a simple salad, or buttered rice all work well.
Don’t forget to drizzle any juices over the carved meat for extra flavor.
Final Thoughts
Air Fryer Classic Roast Chicken delivers the crispy skin and juicy meat you love, with a simple method that’s easy to repeat. The ingredients are basic, the timing is forgiving, and the results are dependable. Once you make it a couple of times, you’ll tweak the seasonings to match your taste and your weeknight routine.
Keep a whole chicken in the fridge, and you’re never far from a comforting, satisfying meal.
Air Fryer Classic Roast Chicken - Juicy, Crispy, and Easy
Ingredients
Method
- Prep the chicken: Pat the chicken dry with paper towels, inside and out.Dry skin equals crisp skin, so don’t skip this step.
- Season generously: In a small bowl, mix salt, pepper, garlic powder, paprika, onion powder, and dried herbs. Rub the chicken with oil, then coat evenly with the seasoning blend. If using lemon, tuck half a lemon and a few herb sprigs into the cavity.
- Let it sit (if you have time): For the best flavor and crisp skin, refrigerate the seasoned chicken uncovered for 30 minutes to 12 hours.Even a short rest helps.
- Preheat the air fryer: Set to 360°F (182°C) for 5 minutes. Preheating helps kickstart browning.
- Load the basket: Place the chicken breast-side down in the air fryer basket. Make sure there’s a little space around it for airflow.
- Cook the first side: Air fry at 360°F (182°C) for 30 minutes.
- Flip carefully: Use tongs and a spatula to flip the chicken breast-side up.Be gentle to avoid tearing the skin.
- Finish cooking: Air fry for another 20 to 30 minutes, until the thickest part of the breast reaches 160°F (71°C) and the thigh reaches 175°F (79°C). Total time is usually 50 to 60 minutes for a 4-pound bird, but rely on a thermometer.
- Optional butter baste: For extra shine and flavor, brush the skin with melted butter in the last 5 minutes.
- Rest and carve: Let the chicken rest for 10 to 15 minutes. This keeps the juices in the meat.Carve and serve with lemon wedges and herbs.
Printable Recipe Card
Want just the essential recipe details without scrolling through the article? Get our printable recipe card with just the ingredients and instructions.